Table of Contents
Skydiving Pictures: Capturing the Essence of Freefall Adventure
Have you ever dreamed of soaring through the sky like a bird? Skydiving offers a breathtaking experience that allows you to witness the world from a whole new perspective. And what better way to capture this incredible journey than with skydiving pictures?
Skydiving pictures aren’t just souvenirs; they’re a means of reliving and sharing the exhilarating moments of your skydive. However, taking stunning skydiving pictures that truly capture the essence of your adventure can be a challenge. Factors like altitude, speed, and wind can make it difficult to get clear and stable shots.
The Target of Skydiving Pictures
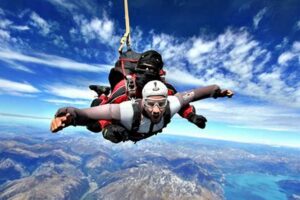
The primary target of skydiving pictures is to capture the essence of the skydiving experience, from the heart-stopping moment of freefall to the peaceful glide of the parachute ride. Skydiving pictures aim to convey the thrill, beauty, and freedom associated with skydiving. The goal is to create images that transport viewers into the skydiver’s perspective, allowing them to feel the rush of adrenaline and appreciate the breathtaking views.
Capture the Perfect Skydiving Pictures with Professional Equipment
Professional skydiving photography equipment is designed to withstand the extreme conditions of a skydive. It includes:
-
High-Quality Camera: A high-quality digital camera with a fast shutter speed and a wide-angle lens is essential for capturing sharp and vibrant images.
-
Stabilization System: A stabilization system, such as a gimbal or a drone, helps keep the camera steady and minimizes vibrations, ensuring stable and smooth footage.
-
Wide-Angle Lens: A wide-angle lens allows you to capture a broader field of view, fitting more of the breathtaking scenery into your shots.
-
Polarized Filter: A polarized filter reduces glare and enhances colors, resulting in more vivid and saturated images.
-
Memory Cards: Bring enough high-speed memory cards to store your images and videos.
Prepare for the Skydive and Capture the Perfect Shot:
-
Dress Appropriately: Wear comfortable clothing that allows you to move freely. Avoid loose clothing or jewelry that could get caught in the equipment.
-
Learn Basic Skydiving Techniques: Understand the basics of skydiving, such as body position and hand signals, to ensure a safe and enjoyable jump.
-
Practice Taking Pictures on the Ground: Before your skydive, practice taking pictures on the ground to get a feel for the camera and its settings.
-
Stay Calm and Focused: During the skydive, stay calm and focused on capturing the perfect shot. Don’t let the adrenaline rush distract you from your goal.
Capture the Perfect Skydiving Pictures with Professional Techniques:
-
Shoot in Burst Mode: Use the burst mode on your camera to capture a series of shots in quick succession. This increases the chances of getting a perfect shot.
-
Experiment with Different Angles: Try taking pictures from different angles, such as above, below, and to the side. This creates visual interest and adds depth to your images.
-
Capture the Sequence of Events: Take pictures throughout the entire skydive, from the jump to the landing. This will help you create a visual story that captures the progression of your experience.
-
Edit Your Photos: Use photo editing software to enhance the colors, contrast, and sharpness of your images. Crop and straighten the photos as needed to create a visually appealing composition.
Conclusion:
Skydiving pictures are a powerful way to capture the essence of your skydiving adventure and share it with the world. By utilizing professional equipment, preparing thoroughly, and employing the right techniques, you can create stunning skydiving pictures that will take your breath away and leave you with lasting memories of your incredible journey through the skies.
Skydiving Pictures: Capturing the Thrill of Freefall
Skydiving is an adrenaline-pumping activity that offers an exhilarating experience like no other. Whether you’re a seasoned skydiver or a first-timer, capturing the thrill of freefall through breathtaking pictures is an integral part of the adventure. In this comprehensive guide, we’ll delve into the essential techniques, tips, and gear you need to take stunning skydiving pictures that will leave you with lasting memories.
Choosing the Right Camera
Selecting the appropriate camera for skydiving photography is paramount. Action cameras like GoPro or similar models are ideal due to their compact size, durability, and ability to withstand the rigors of the jump. These cameras can be easily mounted on your helmet or chest harness, providing a first-person perspective of your descent. DSLRs or mirrorless cameras with fast shutter speeds and wide-angle lenses can also produce stunning images, but they require more careful handling and protection during the jump.
Mastering Camera Settings
To capture sharp and well-exposed skydiving pictures, it’s crucial to adjust your camera settings accordingly. Set your camera to manual mode to have complete control over the aperture, shutter speed, and ISO. For skydiving, a wide aperture (e.g., f/2.8 or wider) is recommended to let in more light and achieve a shallow depth of field, isolating your subject against the vast backdrop of the sky. A fast shutter speed (1/1000th of a second or faster) is essential to freeze the action and eliminate motion blur. Adjust the ISO as needed to ensure proper exposure, but keep it low (e.g., ISO 100-400) to minimize noise.
Composition and Framing
Creating visually compelling skydiving pictures involves paying close attention to composition and framing. Utilize the rule of thirds to position your subject interestingly within the frame. Experiment with different angles and perspectives to create dynamic shots. Capture the excitement of the jump by including elements like the ground rushing beneath you, the vast expanse of the sky, and other skydivers in formation. Incorporating foreground elements like your hand or the parachute cord can add depth and interest to your images.
Capturing the Freefall
The freefall portion of the skydive offers ample opportunities for striking pictures. As you descend, keep your camera steady and focus on maintaining a level horizon. Pan smoothly to capture the changing scenery and the rush of the wind against your face. If you’re jumping with others, try to coordinate synchronized formations and maneuvers to create visually appealing shots. Remember to keep an eye out for unique cloud formations, stunning landscapes, and aerial views that add context and beauty to your images.
Deployment and Descent
The deployment of the parachute marks a transition to a more controlled descent. Capture the moment the parachute opens, as it billows out and fills with air. Experiment with different angles to showcase the parachute’s vibrant colors and intricate patterns. As you descend, use your camera to document the changing perspective of the ground below. Look for landmarks, bodies of water, or interesting features that add context to your skydiving experience.
Landing and Reflection
The successful landing marks the culmination of your skydiving adventure. Capture the moment you touch down, whether it’s on solid ground or in a body of water. Take some time to reflect on your experience and document your thoughts and emotions through photographs. Capture shots of your fellow skydivers, the landing area, and the surrounding scenery. These images will serve as a lasting reminder of your exhilarating journey through the skies.
Safety First
Above all, safety should be your top priority during skydiving. Follow all instructions and guidelines provided by your skydiving operator. Ensure that your camera is securely mounted and does not interfere with your jump. If you’re a beginner, it’s advisable to consult with experienced skydivers or instructors for tips on safe camera handling during the jump.
Additional Tips for Stunning Skydiving Pictures
-
Experiment with different filters and color correction techniques to enhance the visual impact of your images.
-
Use a neutral density filter to reduce the amount of light entering the lens, allowing you to capture longer exposures and create artistic effects.
-
Consider using a remote shutter release to minimize camera shake and ensure sharp images.
-
Take advantage of editing software to fine-tune your photos, adjust exposure, color balance, and remove unwanted elements.
Conclusion
Skydiving pictures offer a unique perspective of the world and
.